Wow, time is flying! When in the planning stages of a trip, everything always seems so distant and that you have tons of time to take care of everything. But here we are just 1 week out from our departure and we have SO MUCH to still finish!
I've been slowly finishing off the van conversion. Wiring in the second battery ended up being relatively easy, although it's taken a good amount of time to finish everything off properly. We can write up a play-by-play guide for that if anybody wants to hear it OR when time allows, but here's the gist of everything:
- Bought a battery isolator kit from Amazon. The kit came with most of the connectors that were needed, the isolator module itself, and enough wire to connect from the starting battery through the isolator module and back to the rear of our van. We chose one that is a "voltage sensitive relay"(VSR) so that the secondary battery will only pull from the starting battery when the van's alternator is actively charging battery #1 (ie. the van is running)
- Mounted isolator to the van within the engine compartment
- Ran cable from isolator through whatever gaps I could find, along the passenger-side frame (away from exhaust pipes to minimize heat) and up through a hole in the floor. That I drilled. Use a rubber grommet anywhere your wiring will be travelling through metal
- Connect secondary battery to cable, run a ground line as well. The second battery we chose is a Deep cycle AGM battery (from Walmart, it was around $100)
- Connect isolator to the starting battery, as well as ground. My van had side posts, so I ended up needing an extended connector so I could attach the cable.
Congrats, you <should> have a working secondary battery!!!
That being said, it still took me several trips to O'Reilly Auto Parts for different connectors, fuses, heat-shrink tubing, and whatever else I needed. And an Amazon order for the different 12V USB sockets, fuse block, etc. And I also wired in an old power inverter from my parents just in case we need something that requires a 120V outlet.
 |
| extended battery bolt to accept additional wiring |
 |
| Engine compartment with finished isolator system. Black square thing is the VSR |
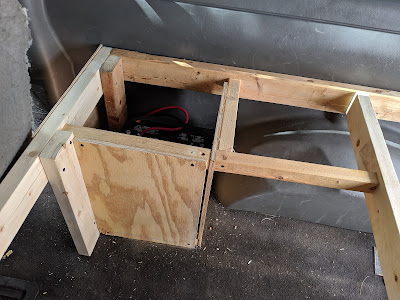
The platform utilizes the same legs as our test platform, as well as much of the lumber. We are fitting our queen mattress sideways rather than lengthwise, so there was some adaptation of course. The "leisure" battery and all other wiring, fuse block, and connections, was isolated by framing a box, although I made sure to leave some air gaps in case things get a little warm in there. I've done a good job of making everything out of scrap lumber that I already own, thereby cutting our costs as much as possible!
 |
| Planning stage of the van conversion |
 |
| Platform is IN! |
 |
| Leisure battery compartment framed in (could have planned this a little better haha) |
 |
| Finished "leisure battery" compartment, with fuse block for 12V sockets |
 |
| Cutting this slick paneling for the floor - easier to slide our stuff under the platform |
We've also been making a VERY strategic packing list so we have room to store all we will need below the mattress platform. I found some storage totes at IKEA that are the perfect size for under the platform, a short bucket from Walmart to use as an emergency toilet: emergency only.
 |
Even though we ordered child-size hammocks, they are still to long to fit across the van.
We are adapting this platform for one more kid to sleep on, we can use ONE hammock
diagonally (will post photos after completion)
 |
| Test fit before top of platform goes in. Easier to visualize the space |
As of today, the wiring is done, platform is done, we have a good idea what can fit where under the platform. And so, we just have to fit our packing list into the available containers, totes, coolers, and whatever else we reserved to HOLD OUR STUFF ! But we have a whole week to do that.....
..................

No comments:
Post a Comment